
|
|
 |
|
|
|
Welcome to the Australian Ford Forums forum. You are currently viewing our boards as a guest which gives you limited access to view most discussions and inserts advertising. By joining our free community you will have access to post topics, communicate privately with other members, respond to polls, upload content and access many other special features without post based advertising banners. Registration is simple and absolutely free so please, join our community today! If you have any problems with the registration process or your account login, please contact us. Please Note: All new registrations go through a manual approval queue to keep spammers out. This is checked twice each day so there will be a delay before your registration is activated. |
|
|||||||
 |
|
|
Thread Tools | Display Modes |
|
|
|
|
#1 | ||
|
Over Thinker
Join Date: Dec 2005
Location: Ipswich Qld
Posts: 1,351
|
for a 1999
Can paper clip in diagnostic plug and engine light technique help retrieve some fault codes on this one ?if so which pins are bridged please many thanks to "Big Damo" this link has a lot of festiva gearbox information http://www.fordforums.com.au/showthread.php?t=11425382
__________________
My car goes Brumm Brumm |
||
|
|

|
| 2 users like this post: |
|
|
#2 | ||
|
Thailand Specials
Join Date: Aug 2009
Location: Centrefold Lounge
Posts: 49,628
|
I'm looking through my shop manual, it mentions the diagnostic connector in the engine bay but doesn't show a pinout or how to get it to flash codes on the dash, I'm certain you can do it but its only showing me how to use Ford's scan tool with the diagnostic connector.
I'll try find the other part of it, theres another electrical supplement, it might be in there. EDIT: Here is the pinout of the diagnosis connector in the wiring diagrams, but nothing on how to bring up engine light flash.  Worst case scenario the Festiva Forum boys might be able to point you in the right direction as well: http://aspire.b1.jcink.com/index.php?act=idx At a guess I'd be saying jumper wire between "GND" and "TEST" Last edited by Franco Cozzo; 01-10-2014 at 05:51 PM. |
||
|
|

|
|
|
#3 | ||
|
Over Thinker
Join Date: Dec 2005
Location: Ipswich Qld
Posts: 1,351
|
The Ford Festiva was a subcompact car built by the Ford subsidiary companies Mazda and Kia Motors from 1986 to 2000. It was sold as a four-door sedan, a three-door and a five-door hatchback in the sub-model types L, LX and GL.
ah they stopped producing these now the penny drops making this thread for archives then there is little information on this model for the forum lets start wiki Second generation (WB, WD, WF; 1993–2000)[edit] Second generation 1994-1996 Ford Festiva (WB) GLi 5-door hatchback (2011-03-10).jpg Overview Manufacturer Kia Motors Also called Ford Aspire Kia Avella Production 1993–2000 Assembly South Korea: Gwangmyeong (Sohari Plant) Body and chassis Body style 3-door hatchback 4-door sedan 5-door hatchback Powertrain Engine 1.3 L Mazda B3 I4 1.5 L Mazda B5 I4 Transmission 3-speed Jatco 3N71 automatic 5-speed manual The second model Ford Festiva was jointly developed between Kia and Ford, retaining most of the drivetrain of the previous model with a more rounded body style. This new Festiva was slightly longer, wider, more aerodynamic, and suspended by MacPherson struts in the front and a torsion bar axle in the rear. While it was sold in certain markets as a second generation Festiva, Ford renamed it the "Aspire" in North American markets, where the five-door model was offered for the first time. In South Korea, the car was badged "Kia Avella". The sedan version was mainly restricted to the South Korean market, although it was also available with Festiva badging in Taiwan. Depending on the market, some retained the SOHC, throttle-body injected motor, while others received an engine with a DOHC cylinder head and MPI also designed by Mazda. These engines were: B3 EGi: 1.3 L (1,323 cc) fuel injected 8-valve I4 making 63 hp (47 kW) at 5000 rpm and 74 lb·ft (100 N·m) at 3000 rpm B5 EGi: 1.5 L (1,498 cc) fuel injected 8-valve I4 making 88.4 hp (66 kW) at 5000 rpm and 99 lb·ft (134 N·m) at 4000 rpm (Asia and Oceania only) Transmission options comprised a five-speed manual transmission, although all models could be optioned with a four-speed automatic. Australian and U.S. models were equipped with a three-speed automatic. Facelifted Ford Festiva Trio S 3-door (Australia) In 1997, the Festiva received a new front bumper with an oval grille, reshaped headlamps, and other minor changes. The Aspire was dropped from the Ford range in the United States after 1997. The second generation Festiva continued to be sold in Australia until 2000 when it was replaced by the Ford Ka. Australian second-generation Festivas have U.S. side marker light cut-outs on each side of the vehicle (driver-side and passenger-side) at the front and rear. Instead of housing orange reflectors/lights at the front sides and red reflectors/lights at the rear sides, there are non-lit orange reflectors at all four locations. These redundant reflectors, coupled with the orange side indicator repeater (which is not required in the U.S., and was not included on the Aspire) make for a unique side profile. Kia developed their following model, the Kia Rio, completely independently, and finished their relationship with Ford.
__________________
My car goes Brumm Brumm |
||
|
|

|
|
|
#4 | ||
|
Over Thinker
Join Date: Dec 2005
Location: Ipswich Qld
Posts: 1,351
|
diagnostic ..DIY
thats good stuff to start with there first I will go ground and test with an LED light its safer thinking on this .
__________________
My car goes Brumm Brumm |
||
|
|

|
| This user likes this post: |
|
|
#5 | ||
|
Thailand Specials
Join Date: Aug 2009
Location: Centrefold Lounge
Posts: 49,628
|
Don't ever use a regular test light when testing electronics, such as ECUs etc, you're 100% on the money with it being safer to use an LED one.
Regular test lights load up the circuit too much when you're dealing with electronics, it might just not light up or worst case scenario pop something inside the module. LED testlights are safe to use with electronics, its not worth the risk. |
||
|
|

|
|
|
#6 | ||
|
Over Thinker
Join Date: Dec 2005
Location: Ipswich Qld
Posts: 1,351
|
Diagnostics information mentions aspire in my research - so going with this for now
this information says use engine light as code reader after the wire is bridged ... ign on but dont start car would you believe on some festivas the ST1 pin is missing ? here is hoping yours isnt this is old information from all sources- and merged and is incomplete for now will try my best to update as better information is found about the festiva ford -kia -mazda vehicle  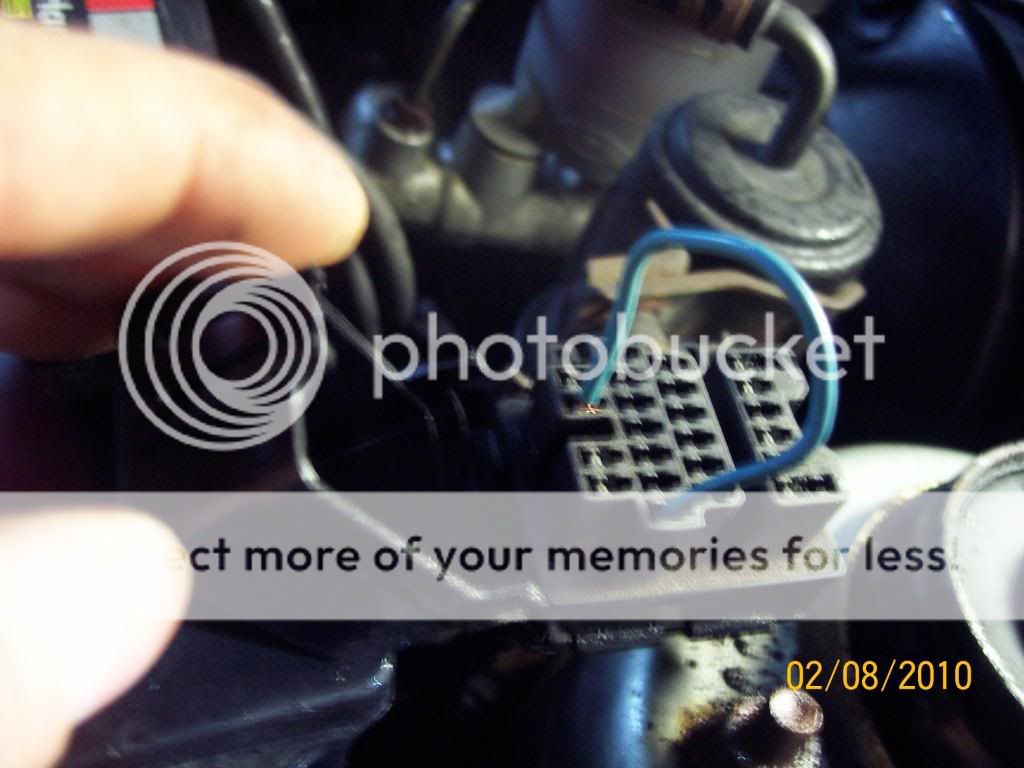 only codes to a 1994 or later ...might find something more up to date dont know (1990 through 1995) trouble code Circuit or system 01 Ignition Diagnostic Monitor (1990 through 1993) 02 Crankshaft Position (CP) sensor (1990 through 1993) 03 Cylinder Identification sensor (1990 through 1993) 03 Camshaft Position Sensor (CMP) (1994 and later) 04 Crankshaft Position Sensor (CKP) (1994 and later) 06 Vehicle Speed Sensor 08 Airflow sensor (1990 through 1993) 08 Mass Airflow (MAF) sensor (1994 and later) 09 Coolant temperature sensor 10 Intake air temperature sensor 12 Throttle position sensor 14 Barometric pressure sensor 15 Oxygen sensor 16 EGR valve position sensor 17 Oxygen sensor 25 Fuel Pressure Regulator Control solenoid 26 Solenoid valve (purge control) 28 EGR control solenoid (1994 and later) 29 lAC solenoid (1994 and later) 34 lAC valve (1990 through 1993) Corrective action 01 Check the distributor circuit to the IDM 02 Check the distributor CP sensor and circuit 03 Check the distributor CID sensor and circuit 03 Check the distributor and ECM circuitry or components 04 Check the distributor and ECM circuitry or components 06 Check the VSS and circuit 08 Check the airflow sensor circuit from the sensor to the ECM for an open or short circuit or a sensor malfunction 08 Check the MAF sensor circuit from the sensor to the ECM for an open or short circuit or a sensor malfunction 09 Check the coolant temperature sensor circuit for an open or short circuit or a sensor malfunction 10 Check the intake air temperature sensor circuit for an open or short circuit or a sensor malfunction 12 Check the throttle position sensor circuit for an open or short circuit or a sensor malfunction 13 When battery voltage is applied to the air conditioning compressor solenoid, a signal is sent to the computer, which interprets the signal as an added load created by the compressor and increases engine idle speed accordingly to compensate. 14 The barometric pressure sensor is integrated within the ECM. Check the ECM power and ground circuits. If no fault is found with the circuits, replace the ECM. .The Intake Air Temperature sensor (IAT), positioned in the air intake duct provides the computer with fuel/air mixture temperature information. The computer uses this information to control fuel flow, ignition timing and EGR system operation 15 Check the oxygen sensor circuit for an open or short circuit or a sensor malfunction The Engine Coolant Temperature (ECT) sensor, which is threaded into a coolant passage in the intake manifold, monitors engine coolant temperature. The ECT sends the computer a voltage on here. 16 Check the EGR valve position sensor and circuit 17 Check the fuel and ignition system performance (I.e. fuel pressure high or low, leaking fuel a rich or lean condition injectors, inoperative fuel injector, intake air leaks, ignition misfire, etc.) 25 Check for an open or short circuit from the solenoid valve to the ECM. Possible broken or (fuel pressure regulator) short circuit from the solenoid valve to the fuel injection main relay. Check for a defective solenoid valve 26 Check for an open or short circuit from the solenoid valve to the ECM. Check for an open or short circuit from the solenoid valve to the fuel injection main relay. Check for a defective solenoid valve. 28 Check for an open or short circuit from the solenoid valve to the ECM 29 Check for an open or short circuit from the lAC valve to the ECM. Check for an open or short circuit from the lAC valve to the fuel injection main relay. Check for a defective lAC valve. 34 Check for an open or short circuit from the lAC valve to the ECM. Check for an open or short circuit from the lAC valve to the fuel injection main relay. Check for a defective lAC valve. Clearing the codes .1 After the self-diagnosis check, remove the jumper wire and close ~tle cover on the DIAGNOSTIC electrical connector. Check the indicated system or component or take the vehicle to a dealer service department or other qualified repair shop to have the malfunction 'repaired. ' After repairs have been made, the diagnostic code must be can deled by detaching the cable from the negative terminal of the battery, then depressing the brake pedal for more than five seconds. •2 After cancellation, perform a road test and make sure the warning light does not come on. If the original trouble code is repeated, additional repairs are required. Information sensors (OBD-I and /I systems)
__________________
My car goes Brumm Brumm Last edited by dirty hands; 02-10-2014 at 06:35 AM. |
||
|
|

|
|
|
#7 | ||
|
Over Thinker
Join Date: Dec 2005
Location: Ipswich Qld
Posts: 1,351
|
1.3 Timing belt ....very basic information
1. Remove timing belt covers 2. Remove timing belt tensioner pulley attaching bolt, then the tensioner pulley, spring and spring cover. 3. If reusing old belt, mark direction of rotation on belt to aid installation....and use zip ties to hold in place 4. Remove timing belt from crankshaft and camshaft sprockets. 5. Check crankshaft and camshaft sprockets, tensioner pulley and timing belt for wear or damage. Replace components as necessary. 6. Align camshaft and crankshaft sprocket timing marks with marks on cylinder head and oil pump housing 7. Install timing belt. If reusing old belt, ensure belt is installed so that direction of rotation mark made during removal is positioned correctly. 8. Install spring and spring cover onto tensioner pulley, then install pulley and attaching bolt. Do not tighten bolt at this time. 9. Install tensioner spring onto anchor, then tighten pulley attaching bolt to torque listed at the end of this section. 10. Reinstall timing belt covers. 
__________________
My car goes Brumm Brumm |
||
|
|

|
|
|
#8 | ||
|
Over Thinker
Join Date: Dec 2005
Location: Ipswich Qld
Posts: 1,351
|
__________________
My car goes Brumm Brumm |
||
|
|

|
|
|
#9 | ||
|
Over Thinker
Join Date: Dec 2005
Location: Ipswich Qld
Posts: 1,351
|
these cars were not popular right
 this is research from this forum going way back in time the search function has the festiva topics in all sorts of forums eadings most without resolution and helpfull stuff May as well combine the good information in one place WA 1993 Ford Festiva From the WA Festiva workshop manual 1 Plugs, gap 1.0-1.1mm, Type NGK BP5ES-11 or BP6ES, or ND W20EXR-U. 2. Points, all electronic. 3. Oil filter Z79A. 4. Total oil capacity 3.4Ltr, --- choose you own oil and grades 5. tyre run about 34PSI. 6. Air cleaner, VA38 (Valvoline P/N), fuel filter Z198. ---------------------------------------------------------- found this if it helps anyone about a 1.3 engine EGR EGR System The EGR System (If fitted) recirculates a small amount of exhaust gas into the Intake Manifold to reduce combustion temperatures and reduce NOx Emissions. The System consists of: 1. The EGR Control Valve 2. The EGR Valve Position Sensor 3. The EGR Vent Solenoid Valve (3 Hose - Normally Open) 4. The EGR Vacuum Solenoid Valve (2 Hose - Normally Closed) 5. The ECM and it’s Input Devices The EGR operation is controlled by the ECM’s actuation of the EGR Vent Solenoid Valve and Vacuum Solenoid Valve to control the EGR Control Valve. It is monitored by the EGR Valve Position Sensor. When the Engine Coolant Temperature is less than 55°C, during Idle (Idle Switch ON), Deceleration, High Speed (Above 5,500 RPM) and Heavy Load, the EGR operation is suspended. When the Engine Coolant Temperature is between 55°C and 60°C and during Acceleration. the EGR operation is reduced. To Test: Exhaust Gas Recirculation (EGR) Solenoid (1.3L Engine Only) The EGR Solenoid Valve is located centrally on the firewall. The ECM actuates the EGR Solenoid with a Duty Cycle signal. To Test Voltages: See ECM Pin #49. ----no picture yet To Test Solenoid Function: Disconnect the wiring connector and vacuum hoses • Verify that air will flow through the valve from A to the air filter. • Verify that air will not flow from A to B. Apply battery voltage across the terminals. • Verify that air will flow from A to B. • Verify that air will not flow from A through the air filter.
__________________
My car goes Brumm Brumm Last edited by dirty hands; 02-10-2014 at 09:40 AM. |
||
|
|

|
|
|
#10 | ||
|
Over Thinker
Join Date: Dec 2005
Location: Ipswich Qld
Posts: 1,351
|
the automatics used ?
cant find it yet as a postive ..need help on this one Wiki says 3-speed Jatco 3N71 automatic first research comes up as 3N71b is a nissan rear wheel 3 speed automatic box I think one of the Automatics used may be this - 1982–1990 RL3F01A/RN3F01A — 3-speed transaxle http://www.makcotransmissionparts.co...df/RL3F01A.pdf this is the Jatco wiki information http://en.wikipedia.org/wiki/List_of..._transmissions
__________________
My car goes Brumm Brumm Last edited by dirty hands; 02-10-2014 at 10:33 AM. |
||
|
|

|
|
|
#11 | ||
|
Thailand Specials
Join Date: Aug 2009
Location: Centrefold Lounge
Posts: 49,628
|
I think they are a 3sp auto, mines 5sp manual though.
|
||
|
|

|
|
|
#12 | ||
|
Over Thinker
Join Date: Dec 2005
Location: Ipswich Qld
Posts: 1,351
|
found one ford festiva automatic tranny I can confirm
yes -only had 3 speed fitted FORD, Festiva 3 Speed FWD, 1989-93. is the Mazda Jatco F3A series 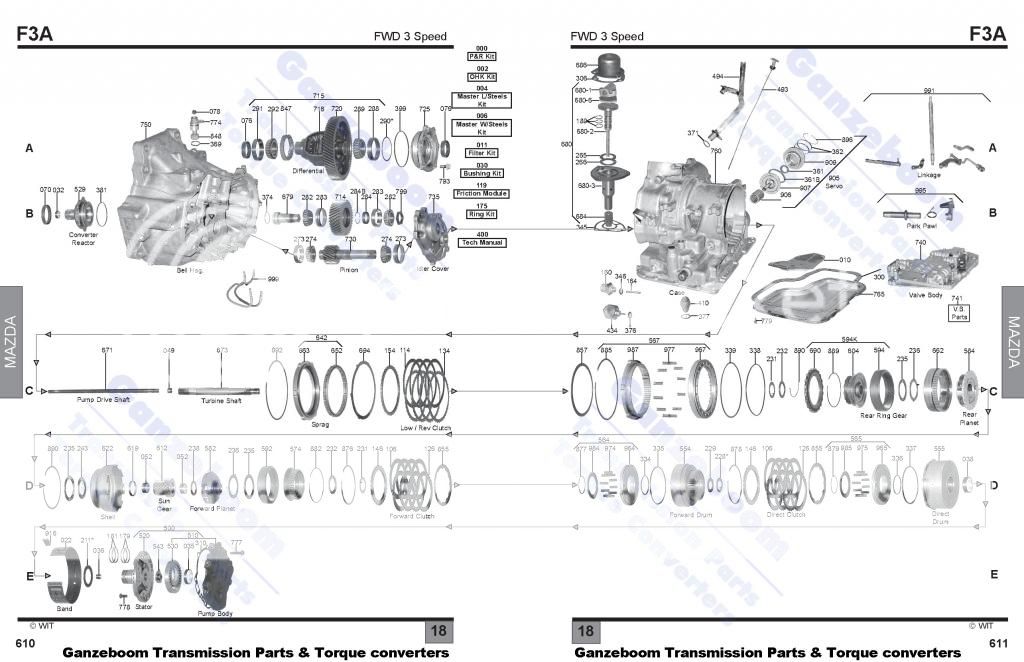 http://www.transmissionpartsusa.com/...its_s/9192.htm http://www.shinseiauto.com/japanese/...mazdaf3a04.pdf
__________________
My car goes Brumm Brumm Last edited by dirty hands; 02-10-2014 at 02:20 PM. |
||
|
|

|
|
|
#13 | ||
|
Over Thinker
Join Date: Dec 2005
Location: Ipswich Qld
Posts: 1,351
|
arrgg what happened to the pictures reloaded in order
.................................................. ........................ Timing Belt 1.3 engine 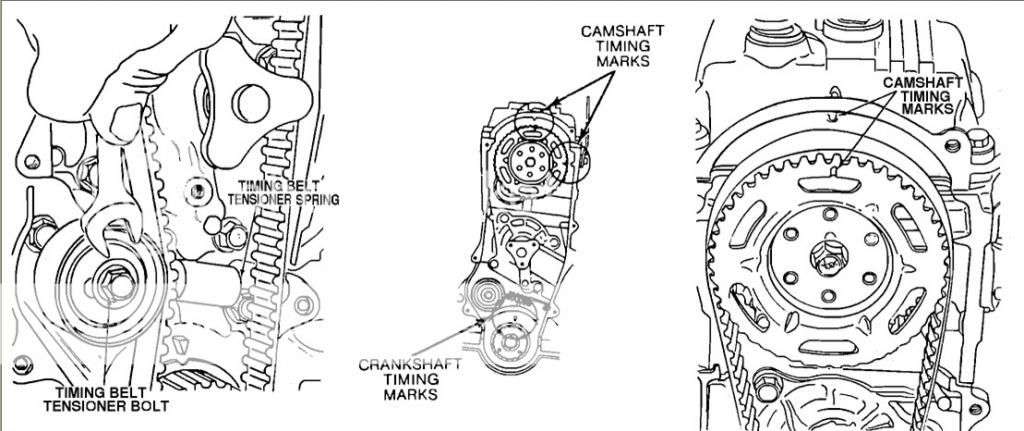 engine bay 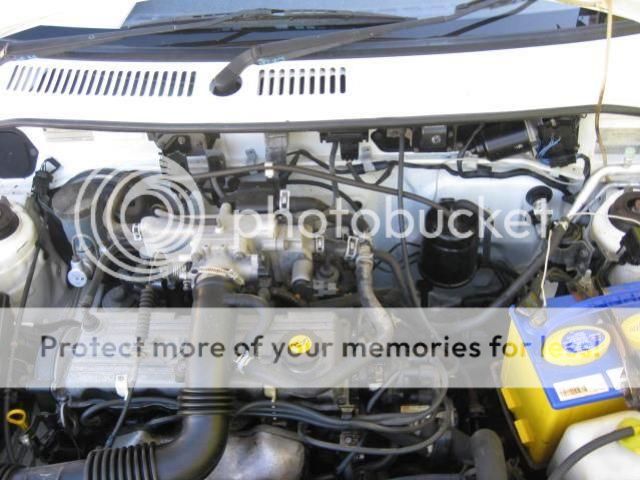 earlier festiva engine bay 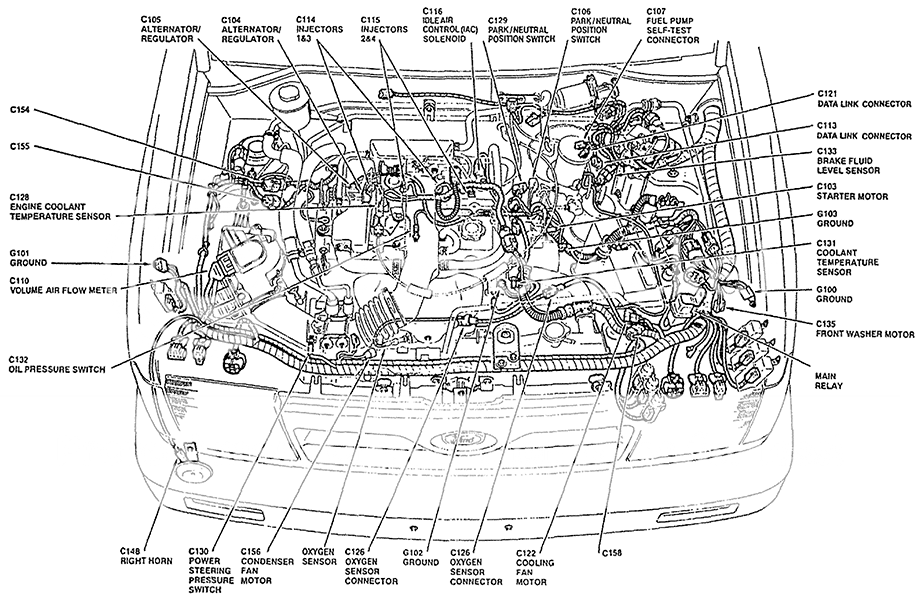
__________________
My car goes Brumm Brumm |
||
|
|

|
|
|
#14 | ||
|
Where to next??
Join Date: Oct 2006
Location: Sydney
Posts: 8,893
|
That Wiki is not 100% correct.
The WB came out with a 66kw engine for only a short time - I think early- 1997 to mid 1998. From Late 1998 and into the WF series they were a lower output 1.5L engine - 57kw and 115nm if I recall. Also, I believe that the GLXi models (4dr) were 4sp boxes.
__________________
___________________________ I've been around the world a couple of times or maybe more....... |
||
|
|

|
|
|
#15 | ||
|
Over Thinker
Join Date: Dec 2005
Location: Ipswich Qld
Posts: 1,351
|
thats the Information I am seeking Yellow_Festiva thank you
cant go back and edit the posts for the forum so all one can do us update with the correct data when confirmed and hope members read the whole topic
__________________
My car goes Brumm Brumm Last edited by dirty hands; 04-10-2014 at 06:17 AM. |
||
|
|

|
|
|
#16 | ||
|
Over Thinker
Join Date: Dec 2005
Location: Ipswich Qld
Posts: 1,351
|
one repair manual for a fiesta Mark 3 89-95 -300 pages - no gearbox section wow
engine and gearbox remove togeather ---thats it http://vk.com/doc-50029547_161721090...13b3cd81cf1c0b
__________________
My car goes Brumm Brumm |
||
|
|

|
|
|
#17 | ||
|
Over Thinker
Join Date: Dec 2005
Location: Ipswich Qld
Posts: 1,351
|
some one had a question about his model ...amazing
__________________
My car goes Brumm Brumm |
||
|
|

|
|
|
#18 | ||
|
Starter Motor
Join Date: Aug 2015
Posts: 1
|
Whats that little plug/hose thing on the top left corner of the engine right next to the fan belt? cheers
|
||
|
|

|